Showing posts with label how to. Show all posts

Wednesday, March 23, 2011

On the Prep List: Basic CPR and First Aide

If you were with someone who had a heart attack or almost drowned, would you know what to do? When blood flow or breathing stops, seconds count. Permanent brain damage or death can happen quickly. If you know how to perform cardiopulmonary resuscitation (CPR), you could save a life. CPR is an emergency procedure for a person whose heart has stopped or is no longer breathing. CPR can maintain circulation and breathing until emergency medical help arrives.
Even if you haven’t had training, you can do “hands-only” CPR for a person whose heart has stopped beating. “Hands-only” CPR uses chest compressions to keep blood circulating until emergency help arrives. If you’ve had training, you can use chest compressions and rescue breathing. Rescue breathing helps get oxygen to the lungs for a person who has stopped breathing. To keep your skills up, you should repeat the training every two years.

Basic CPR is on this weeks "prep list" here at our house.  It's been a while since I got my CPR certification so I need a brush up and I want the boys to know what to do in the event of an unforeseen emergency.  Better safe than sorry.  So, I started searching for some on-line info. on things I want to be sure everyone here knows how to do.   First on the list is CPR, so we watched this quick "how to" You tube" video and did some  roll playing with each taking turns being the victim and the rescuer.  We also practiced making "the 911 call" so that didn't feel foreign to them.  Here's some of what we've learned:

Before you begin
Before starting CPR, check:
  • Is the person conscious or unconscious?
  • If the person appears unconscious, tap or shake his or her shoulder and ask loudly, "Are you OK?"
  • If the person doesn't respond and two people are available, one should call 911 or the local emergency number and one should begin CPR. If you are alone and have immediate access to a telephone, call 911 before beginning CPR — unless you think the person has become unresponsive because of suffocation (such as from drowning). In this special case, begin CPR for one minute and then call 911 or the local emergency number.
  • If an AED is immediately available, deliver one shock if instructed by the device, then begin CPR.

Remember to spell C-A-B

In 2010, the American Heart Association changed its long-held acronym of ABC to CAB — circulation, airway, breathing — to help people remember the order to perform the steps of CPR. This change emphasizes the importance of chest compressions to help keep blood flowing through the heart and to the brain.
For a printable pages with CPR and Heimlich instructions (for adult, child and infant) that you can post at your house, go to:  http://www.mayoclinic.com/health/first-aid-cpr/FA00061/METHOD=print


Today it is adult CPR, next is child and then infant.  Following that, we will move on to Heimlich and then First Aide.

This video is the "up-to-date" method of providing CPR for anyone even if they are not "certified".  For more advanced information, it is best to sign up for certification.  There are classes offered frequently.  You can check these sites for  finding local CPR, First Aid, AED and Emergency Cardiovascular Care (ECC) classes. 


Here's our "victim" and our "rescuer"...hey, is that victim smiling?


Here's a video that's quick enough to hold every one's attention, however, I suggest you go through the process with everyone you're teaching because it helps them to remember the technique better.  (**Note: Do not actually do chest compressions on someone with a beating heart but do learn where on the chest to place  your hands to perform compressions.)  Also, it's a great idea to practice occasionally, perhaps try to get back to it every 3 months or so.
During the video you may have noted that they suggest doing compressions to the beat of the song by the Bee  Gees called "Stayin' Alive"...hahahaha!  So I found the You Tube for it so my kids would have the approximate rhythm in mind to follow... hahaha!  So here you go, just in case you have kids who aren't old enough to remember this one!
(The boys thought the Bee Gees had on strange pants!)


Well, if you actually watched that to get the beat or just for the heck of it, I'll bet you're at least smiling right now (or smirking).  Making preparation doesn't have to be all serious, (even though it is serious business) it should be a fun time to learn things together that benefit us and those around us.

Pro 3:5-8  Trust in Elohim with all thine heart; and lean not unto thine own understanding. 
  In all thy ways acknowledge him, and he shall direct thy paths. 
  Be not wise in thine own eyes: fear Elohim, and depart from evil. 
  It shall be health to thy navel, and marrow to thy bones. 

Blessings to your home:)

Here's advice from the American Heart Association:
  • Untrained. If you're not trained in CPR, then provide hands-only CPR. That means uninterrupted chest compressions of about 100 a minute until paramedics arrive (described in more detail below). You don't need to try rescue breathing.
  • Trained, and ready to go. If you're well trained and confident in your ability, begin with chest compressions instead of first checking the airway and doing rescue breathing. Start CPR with 30 chest compressions before checking the airway and giving rescue breaths.
  • Trained, but rusty. If you've previously received CPR training but you're not confident in your abilities, then just do chest compressions at a rate of about 100 a minute. (Details described below.)
The above advice applies to adults, children and infants needing CPR, but not newborns.
Take a look at the  blog hop "Preparedness Challenge" which is inspired by the events in Japan over at Homestead Revival


Tuesday, March 22, 2011

In the Kitchen: Water Kefir Grains...I'm so excited!!

I finally received my new kefir grains, Yay!!  I got milk kefir because my old grains finally gave up the ghost, R.I.P., they served me well!  And, I also got water kefir grains, which I have never had before and a butter milk culture which I  have also never used before.  I purchased these because I love using kefir AND I think that having live cultured foods in the days ahead will be beneficial for us.
Also, water kefir makes a nice alternative drink that has low sugar content and is slightly effervescent and has lovely probiotic properties.


Here's a picture of the water kefir grains in their dehydrated state, just out of the package.  The process for re-hydrating the water kefir grains is very simple.

Supplies
1 quart glass jar
1 wooden or plastic spoon
1 tea towel or coffee filter
water kefir grains
1/4 c organic sugar per qt. of water
(Rapadura or Sucanat are good)
Non-chlorinated water

Rehydrating Water Kefir Grains

Dissolve 4-6 tbsp. of sugar in 4 c of water ( you may need to heat water to get sugar to dissolve, BUT BE SURE TO ALLOW WATER TO COME BACK TO ROOM TEMP. PRIOR TO ADDING YOUR KEFIR GRAINS)


Place the kefir grains in the sugar water.  (This water is dark because the raw sugar is unrefined so the color is more like "brown sugar" so the water color reflects to color of the sugar)

Cover with a towel or coffee filter and secure with a rubber band.  Allow mix to sit for 3-4 days until grains are plump.  Once grains are rehydrated, we'll be able to begin making our water kefir.

I'm so excited because I've heard so many cool things about water kefir, so I can't wait to make some and see how it turns out!  I'm really hoping that my kids and B. Faith will love this "new bubbles pop" because it's so good for their tummies:)

For more information about kefir and it's benefits here are a couple of sites to look into:
1.  Dom's Kefir

2. Cultures for Health (Which is where I purchased my grains)

I'll keep you posted on how my water kefir goes but it will take about a week before I have a product that is drinkable.

In the Kitchen: Soaked Pancakes

This is my favorite home made pancake recipe and it's a healthy one (as pancake recipes go)!  It's a "soaked" pancake recipe from Sally Fallon's "Nourishing Traditions."  It's very easy, but does require a little pre-planning the evening before...however, you can make these ahead and freeze them for future breakfasts or snacks.

Pancake Recipe:

2 c fresh whole wheat flour, Kamut, or spelt
(I use whole wheat flour)
2 c buttermilk, kefir or yoghurt (choose only one)
2 eggs, lightly beaten
1/2 tsp sea salt
1 tsp baking soda
butter to fry cakes in

Mix flour in buttermilk, kefir or yoghurt.  (I have used all three and it doesn't seem to make much change in the final out come although I would say kefir is probably my favorite, if I had to choose.)

Cover and set in a warm place for 12-24 hrs. (for those with milk allergies, you can use 2 c filtered water and 2 tbsp. whey or 2 tbsp. vinegar or lemon juice instead of buttermilk, kefir or yoghurt)


After this has soaked...stir in remaining ingredients and

 cook on hot oiled cast iron skillet.  
These cakes cook a little more slowly than unsoaked cakes and texture is much more moist.
Serve with real maple syrup or raw honey or berry jam.   We like ours with maple syrup and over easy eggs...Yummmmm!

To read about the benefits of pre-soaking grains, go to: 
Soaking or fermenting grains prior to consuming them is an important step that the industrial age has removed from our food preparation in an effort to save time at the expense of our health.

The Weston Price foundation is an excellent resource for healthy food prep. information (although they do not follow "biblically clean eating"), they teach "lost" information related to proper food preparation and eating things the way Abba intended for us to eat such as butter, meat, eggs, etc.
Check 'em out...there's a LOT of news you can use there!

He causes the grass to grow for the cattle and the herb for the service of man, that He may bring forth food out of the earth.
-Ps 104:14

Tuesday, February 15, 2011

How to: Make Vapor Rub Recipe


Here is a recipe that was sent to me by the gals in my Wise Home group.  Lots of people find relief from their cold symptoms by rubbing Vapor-Rub on the soles of their  feet then putting a warm pair of socks on prior to climbing into bed.  Our own  little B. Faith likes to have her Mama rub “medicine on her feeties” when she’s not feeling good so this is a recipe for those times when colds strike that has some real healing ingredients and none of the unhealthy ingredients found in the otc (over the counter) brand name products.

Here is my Coconut and olive oil, bees wax and essential oils for the ointment.
DateMonday, January 31, 2011 at 8:00AM
When your family gets a cold, especially kids, something like Vapor-Rub can be just what you need to help everyone get much-needed rest at night.  Except that store-bought Vapor-Rub is full of junk!  It's petroleum-based, first of all, and why do we want to be rubbing that on our skin?  Second, the adult version contains menthol, which has been shown to cause lung problems in some babies and children (and, I wouldn't be surprised, adults too).  Not really a good option.  There has to be a better way!
When my kids came down with minor colds recently, I decided to mix some up and see if it helped.  It did.  My daughter, who had coughed quite a bit the night before, slept soundly.  My son...didn't, but if you've read my posts on sleeping babies, then you know he never sleeps through the night anyway.  But every time I went in his room he was breathing freely, so there's that!  (And the following night he did give me a good 7-hour stretch, so...that's something too!)
Best of all, this is completely natural and safe for people of all ages.  Here's what you need:
  • 5 tbsp. extra virgin coconut oil (a natural anti-viral)
  • 1 tbsp. evening primrose oil (could use sweet almond, olive, etc. if you want)
  • 2 tbsp. beeswax
  • 8 - 10 drops tea tree essential oil (also a natural anti-viral)
  • 15 - 20 drops rosemary essential oil (aids breathing)
  • ***Note: you can also use Wintergreen, peppermint or Eucalyptys oils in the mix.
  •  I am currently using Rocky Mountain essential oils.
In a small pan over low heat, melt the coconut oil and evening primrose oil.  Add the beeswax, chopped up or in granules (mine was in a large chunk, so I chopped) and stir until melted.  Add the essential oils and stir to combine.  Pour into a 4-oz. glass jar and allow to cool.  This mix is not completely solid even when cool, so be careful of that when you open the jar.  
Before bed, put this mixture on the feet and then put socks over it.  When it's put on the feet, it's absorbed quickly into the body and it goes through the whole system.  That's why it works.  You could follow this up with a spoonful of raw honey, and the same essential oils in a humidifier (which I did).  Worked great, and we all got sleep!

***Note: You can also must mix your oils in just a carrier oil such as olive oil or coconut oil without the beeswax but the bees wax will help it not to be so liquid so that it stays put a little better.  Without it, even the coconut oil melts and becomes liquid at about 76* and will be quite runny.
So mix some of this up and the next time someone in  your house has the sniffles, be sure to "rub some medicine on their feeties" so they can feel better.


Tuesday, February 8, 2011

Canning Butter?? Yes, you can! (...Uhemm, no pun intended)


 **Let me note here:  Before I get too far into this post… Butter is best fresh and raw if possible and if not raw then cultured would be your next best choice…however, for the purpose of storing without refrigeration the video below explains just how to do that.


I ran across this video the other day and I was really excited to see it.  It is a video on CANNING BUTTER.  I have thought many times how sad it would be to be short of butter if there was no way to store it or you just didn’t have access to it for a period of time.  Some folks may not care much about not having any butter on hand, but for me…it’s gonna be a sad, sad day when I can’t lay my hands on a stick of butter, sour cream, cream or the good ‘ole “incredible edible egg!”  We use a pound or two of butter every week…not margarine, butter, the real thing!   Weston Price Foundation has much info. On the matter of butter and its health benefits.    If you are not currently familure with this information log on to:
And check out these articles:

On the video...what she actually has after boiling the butter is "ghee" but if she doesn't skim the butter fats off the top and just puts them into the jars, those fats could be shaken back into the product while still warm...if you wanted to.

Now here it is…


I hope you found this helpful:)


Sunday, February 6, 2011

Bake soil to pasteurize before germinating seeds...who knew?

Well, with all the snow and cold temps. the U.S. is experiencing, it’s hard to believe it’s almost time to start your indoor seeds for the garden.   I have wondered about how we would start our seeds if we were no longer able to purchase a pre-sterilized medium, knowing you’re not supposed to use dirt right out of the garden because of parasites and organisms which can inhibit sprouting.  The other day I saw an article on one of my favorite “survival blogs” that told me just how to do it. 


The link is found here:  http://modernsurvivalblog.com/survival-garden/bake-soil-to-sterilize-before-germinating-seeds/


Here's the post:


Bake soil to pasteurize before germinating seeds
For best results to successfully germinate seeds, soil from the garden should not be used unless it is first pasteurized to kill weed seeds and fungi. It is also safe practice to pasteurize potting soil bought from the store prior to planting seeds, although theoretically you can purchase ‘sterile’ potting mixes for this purpose.
Why should I pasteurize the soil before planting or germinating seeds? To eliminate some of the organisms that could harm your seedlings, and to eliminate their spores. The process usually kills most diseases, weeds and insects in the soil.
The procedure is pretty simple if you follow just a few rules.
How to pasteurize Soil or Dirt prior to planting and germinating seeds
Add soil or dirt to a baking pan
Cover the pan with aluminum foil
Bake at 180 degrees F (82 C)
When internal soil temperature reaches 180 F, Bake for 30 more minutes


Tips:
Be sure that the soil is moist (not dry, not soaking wet). If dry, add a bit of water and mix it up. If wet, then let it evaporate out first. The soil should clump together somewhat, when squeezed in your palm.
Use a Jelly thermometer or Fry thermometer. Poke a hole in the foil and insert thermometer until it is about in the middle of the soil depth. Be sure to use a thermometer that is oven safe.
You can also use a non-oven-safe thermometer by sliding out the oven tray and occasionally check the internal temperature until it is 180 degrees F. Once at 180, then start a 30 minute timer.
My experience is that baking soil with 9×13 baking dishes (about 2 inches deep) takes about 45 minutes to get internal soil temperature to 180 F (with oven set to 190 F). So the entire process takes about one hour and a half.


Caution:
It is important not to let the temperature of the soil rise above 200 degrees F, since plant toxins are reportedly produced above that temperature (I’ve read this, but am not absolutely sure if the ‘toxin’ part is accurate). If you have digital controls or a digital gauge on your oven, then it’s easy – just set the oven to 180. Otherwise, you will need to keep an eye on it.
Be prepared for an unpleasant odor (My experience actually has not been that bad… it’s not like cooking brownies though.


I Hope you found this as helpful as I did.  May you have a blessed week.
Traci 

Sunday, January 16, 2011

Activated Charcoal and it's uses at home: Using Charcoal to clean my teeth

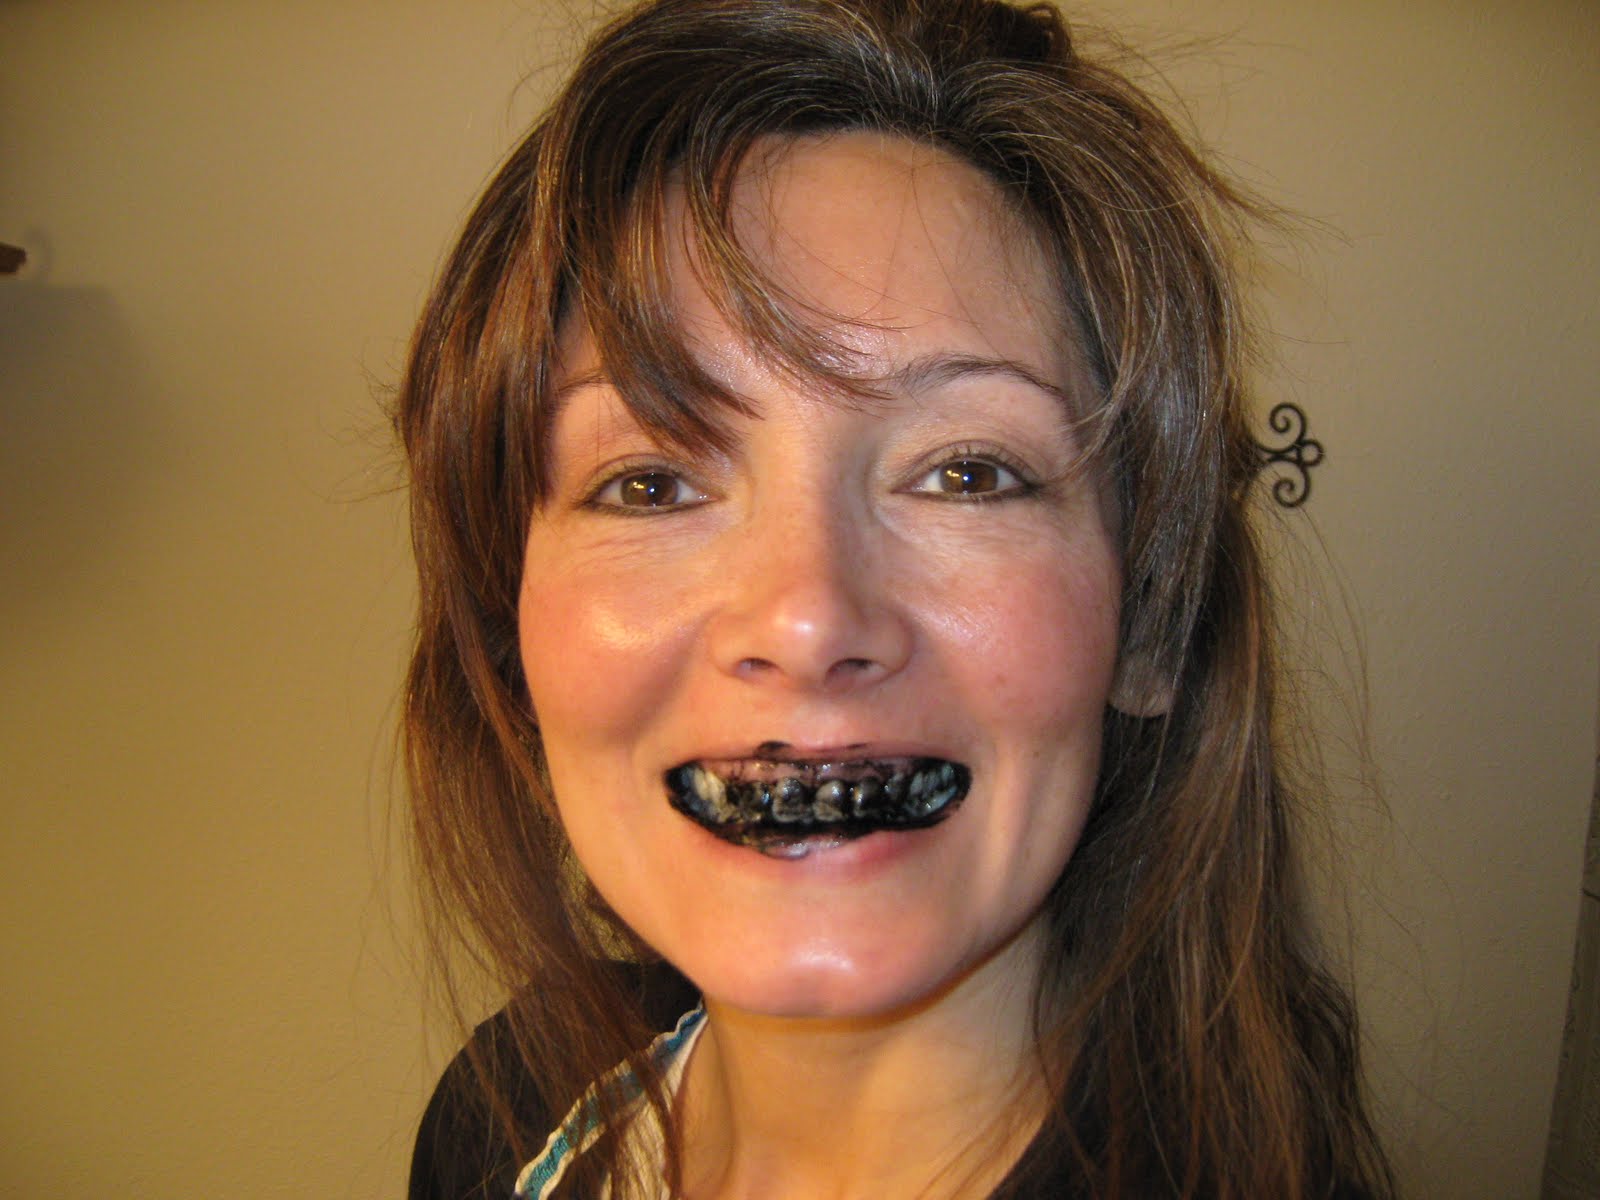
Whoa!!   Is she pretty or whatttt!!!  Okay, no.

Ok (Megan this is for you), I can't post stuff that I don't or won't do my self...Soooooo, I did it. I have been wanting to brush my teeth with my charcoal forever and today I finally got it out and just did it! I plan to do it regularly too.
It wasn't too bad really. It doesn't have much taste and it is mostly
just chalky. But BE WARNED...It is messy. It's such light weight powder that it makes quite a mess so don't get it out with your best

white shirt on!!!  What you can do is mix up a little with water in a small container then add the essential oil/oils of your choice.  I added cloves but you could add whatever you like, peppermint, spearmint, tea tree (not sure how that would taste), orange...and so on.  Also, I suggest covering your shirt while brushing because it does tend to splash.  After I brush with it, before rinsing, I floss so I am sure to get it up into my gum area to pull out any thing living in there that I don't want.  I then have to go back and brush again just to get the black stuff out from between my teeth but they feel CLEAN!

I would say you may not want to do this everyday because it is a little time consuming but I would think once or two times each week would be a great addition to your oral care routine.  

Here are a couple of pics Tanner took of me...one with charcoal and one without (just so you can see I really do have teeth).

 Wow, that does look bad doesn't it?

Tanner says I'm "cheesy."  Really?

Read on to learn about the benefits of activated charcoal and why you should have it around...

Activated Charcoal And It's Uses At Home


Most people know that if you get food poisoning or ingest something that is toxic that if you go to the hospital, often times, they will administer activated charcoal. Why? Because it is safe, cheap and most of all, IT WORKS!!

What does it do? It works as an absorbent for toxins in the digestive system, relieves gas, fungi, viruses, bacteria and as I mentioned, food poisoning. Research is showing it may also aid in lowering cholesterol levels. It is good to take at the first hint of stomach flu as it may stop it before it gets started. You don't want to take more than instructed at any given time as it may cause constipation so you have to take it with lots of water and remember...while pulling out the bad stuff it is also pulling out good stuff too. But you're only taking it when needed so it is not a problem unless abused (as is anything that is good.)

What else is it good for you might ask...Here's a few things it can be used for:
-Drug overdose
-reaction to drugs
-counteract poisons
-diarrhea
-gas
-bites and stings
-vomiting
-filtering water
-poulticing wounds
-cleaning and whitening teeth
-breast infections
-abscesses
-boils

Charcoal is used as a filtering agent for water because it pulls out toxins. It can be made into a paste to clean your teeth and because of it's drawing abilities cleans gum areas well. It is also used as a poultice for infected wounds and boils to draw out infections.

How to use Charcoal:
-Charcoal slurry: 1 TBSP Activated Charcoal in a glass of water. Repeat in 30 min. Follow each glass of slurry with a clear glass of water to avoid constipation.
-Charcoal water: 1/4 c Activated Charcoal powder in 2 qt. jar. Slowly fill jar with water, cap jar and shake well. Let sit to settle for about 1/2 hr. Now you have charcoal water. If you feel you are "coming down with something," you can sip on it throughout the day. (Flu or cold or whatever you think is going on.) The water will be gray but isn't unpleasant to drink and it purifies the water too!
-Poultices: To draw out infections use Activated Charcoal alone or with ground flax seed and moisten with caster oil or olive oil. You can warm it to make it more effective then smear it on clean cloth or gauze and place on affected area and cover with plastic wrap. Or you can just place the Charcoal inside of a cloth or gauze and wrap it like a burrito so it doesn't spill out and wet the cloth and place over area (Just depends on what you have on hand and the situation).

Note: -Remember, it may cause constipation if you don't drink enough water.
-Don't eat dairy products when taking it. Milk product decrease it's ability to work.
- It will take out prescription meds while taking out other things!!! Take it 1 1/2- 2 hrs. from taking other meds.

Where can you get some? Go to the bulk Herb store online at:

The following You Tube post will show you some charcoal tips...

****Just in case a stranger stumbles in here who doesn't know me and reads this (and maybe just doesn't have any good common sense)...This blog does not intend to give any medical advice. This is just common sense information that any Tom, Dick or Harry can apply to every day living situations. These things have been practiced for years in the homes of families who cared for their own wellbeing. You are responsible for whatever info. you find here and choose to use and for how you use it. The writer of this blog is not liable for any problems arising from the use of this info.

Gooood day!
Related Posts Plugin for WordPress, Blogger...